Distributive webhook
Distributive webhook extension allows for distribution of header-level or multiple-lines-level fields to respective line items. This is handy when some values appear only once per multiple lines.
Install distributive webhook extension
Distribution of values to line items is provided as a service by Rossum.ai in the form of a webhook. To start using the extension, follow these steps:
- Login to your Rossum account.
- Navigate to Extensions → My extensions.
- Click on Create extension.
- Fill the following fields:
- Name:
Distributive Webhook - Trigger events:
Document content: Initialize, Updated - Queues where the extension should be executed
- Extension type:
Webhook - URL (see Available endpoints below)
- Under Advanced settings find Additional notification metadata and enable
SchemasandQueues
- Name:
- Click Create the webhook.
Available endpoints
| Environment | Webhook URL |
|---|---|
| EU1 Ireland | https://elis.rossum.ai/svc/distributive/validate |
| EU2 Frankfurt | https://{your domain}.rossum.app/svc/distributive/validate |
| US east coast | https://us.app.rossum.ai/svc/distributive/validate |
| Japan Tokyo | https://shared-jp.app.rossum.ai/svc/distributive/validate |
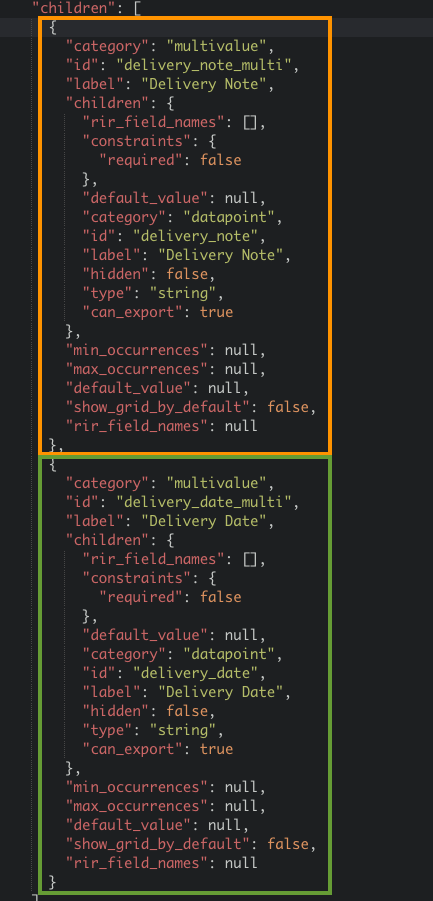
Add the fields to schema
The distributive webhook needs the following fields:
- Multi-value field for extracting the header-level or multi-line-level fields - source of the distribution
- Line item field - target of the distribution
Configure the queue
The source and target fields of the distribution are configured in each queue metadata:
- Make sure the queue is selected in the distributive webhook extension
- Save the configuration into the queue metadata - you need to use the API
Configuration example
The configuration follows this format:
{
  "distributive_fields": {
    "{line items table schema ID}": {
      "{line item field (target) schema ID}": {
        "schema_ids": ["{multivalue field's child (source) schema ID}"]
      }
    }
  }
}
For the sample schema above, the configuration would look like this:
{
  "distributive_fields": {
    "line_items": {
      "item_delivery_note": {
        "schema_ids": ["delivery_note"]
      },
      "item_delivery_date": {
        "schema_ids": ["delivery_date"]
      }
    }
  }
}
Change the Direction of Distribution
The default direction of the distribution is downwards, to the rows below the value.
For cases when the value should be distributed to the rows above it (instead of the ones below), it is possible to specify the preferred direction.
{
  "distributive_fields": {
    "line_items": {
      "item_delivery_note": {
        "schema_ids": ["delivery_note"],
        "preferred_direction": "upwards",
        "preferred_direction_only": true
      }
    }
  }
}